Homemade Reese’s Cups Classic
Highlighted under: Desserts Made Easy
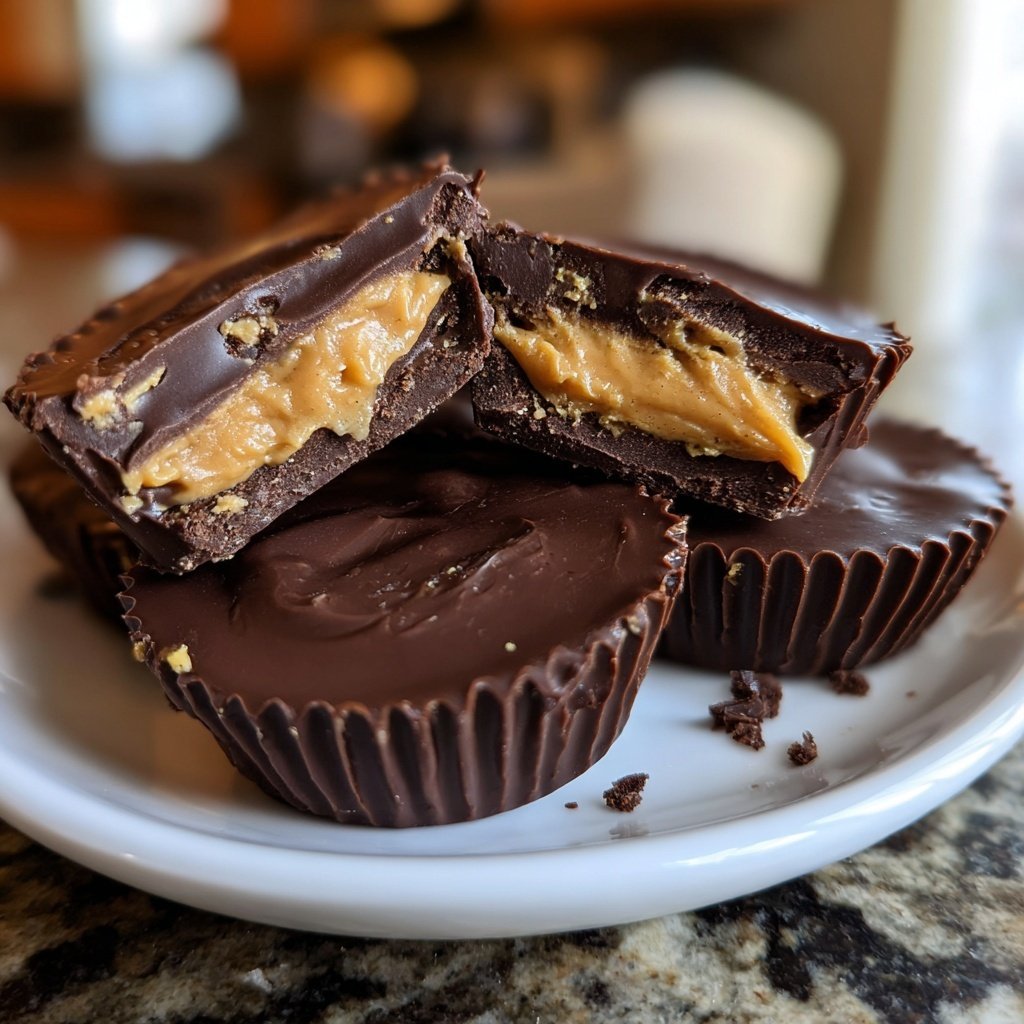
I absolutely love creating my own candies at home, and these Homemade Reese’s Cups are a true delight. The combination of rich chocolate and creamy peanut butter is irresistible, and knowing that I made them myself makes them taste even better. With just a few simple ingredients, I can whip these up in no time. Whether I'm treating myself or sharing them with friends, these indulgent treats never fail to impress. Let’s dive right into the deliciousness!
When I first decided to make these Homemade Reese’s Cups, I was surprised by how easy it was to achieve the same amazing flavors as the store-bought version. By melting high-quality chocolate and blending natural peanut butter, I was able to create a filling that was creamy yet perfectly balanced. I found that using a silicone mold really helped in shaping and removing the cups without any mess.
One of my favorite parts about this recipe is how versatile it is. I love experimenting with adding a sprinkle of sea salt on top or mixing in crushed pretzels for an extra crunch. It’s those little touches that can elevate a simple recipe into something truly special. I can’t wait for you to try these!

Why You’ll Love This Recipe
- Decadent chocolate that melts in your mouth
- Creamy peanut butter filling made from scratch
- Perfect for gifting or keeping all to yourself
Understanding the Chocolate Coating
The chocolate coating is crucial for achieving that perfect Reese's texture. I recommend using a quality chocolate chip option, as the flavor will shine through. To prevent the chocolate from seizing, ensure that your bowl is completely dry and free of moisture before adding your chocolate and coconut oil. Heating in 30-second intervals allows you to control the melting process, ensuring a smooth and glossy finish. Aim for a temperature just below 110°F; if it looks shiny and flows easily, it’s ready.
If you prefer a robust flavor, dark chocolate adds a delightful bitterness that pairs beautifully with the sweetness of the peanut butter filling. For those who want a sweeter experience, milk chocolate hits the mark. You can even experiment with flavored chocolates, such as sea salt or caramel-infused varieties, to create your unique spin on homemade Reese’s Cups!
Crafting the Perfect Peanut Butter Filling
Making the filling from scratch offers greater control over sweetness and texture. Using creamy peanut butter ensures that it blends smoothly with the powdered sugar and vanilla extract. If you have a nut allergy or prefer a different taste, feel free to substitute peanut butter with almond butter or sunbutter, keeping in mind the flavor variations they bring to the classic recipe. The filling should be thick yet spreadable, so adjust the powdered sugar to achieve your desired sweetness.
Mixing the filling until creamy is essential; small lumps can lead to an uneven texture and a less enjoyable experience. A stand mixer or hand mixer will give you the smoothest results, but mixing by hand works too—just be sure to put in some elbow grease. Also, consider adding a pinch of salt to enhance the flavor profile and balance the sweetness, creating a perfectly balanced treat.
Ingredients
Gather these ingredients to make your Homemade Reese’s Cups:
For the Chocolate Coating:
- 1 cup of chocolate chips (milk or dark)
- 1 tablespoon of coconut oil
For the Peanut Butter Filling:
- 1/2 cup of creamy peanut butter
- 1/4 cup of powdered sugar
- 1/2 teaspoon of vanilla extract
Make sure to have everything measured out for a smooth preparation process!
Instructions
Follow these easy steps to create your Homemade Reese’s Cups:
Melt the Chocolate
In a microwave-safe bowl, combine the chocolate chips and coconut oil. Heat in 30-second intervals, stirring between each until the mixture is smooth and fully melted.
Prepare the Muffin Molds
Line a muffin tray with paper liners or use silicone molds. Once the chocolate is melted, spoon a tablespoon into each mold, spreading it to cover the base evenly.
Mix the Filling
In a separate bowl, mix the peanut butter, powdered sugar, and vanilla extract until smooth and creamy.
Assemble the Cups
Once the chocolate base is set, add a generous spoonful of the peanut butter mixture on top of the chocolate in each mold.
Finish with More Chocolate
Pour additional melted chocolate over the peanut butter filling to cover it completely. Tap the tray gently on the counter to remove air bubbles.
Chill and Serve
Place the tray in the refrigerator for about 15-20 minutes or until the chocolate has hardened. Once set, enjoy your delicious homemade treats!
Ensure to store any leftovers in an airtight container at room temperature or in the fridge!
Pro Tips
- For an extra twist, consider adding a sprinkle of sea salt on top of the chocolate before chilling for a sweet-salty flavor explosion.
Storage and Shelf Life
These Homemade Reese’s Cups can be stored in an airtight container at room temperature for up to a week. However, if you want to extend their shelf life, refrigerating them is a great option. Cold storage not only prolongs freshness but also enhances the firm texture of the chocolate coating. Just be sure to let them sit at room temperature for about 5 minutes before enjoying, which allows the chocolate to soften slightly for an improved mouthfeel.
If you plan to store them longer, consider freezing the cups. Freeze them individually on a baking sheet first, then transfer to a freezer-safe container. They will hold well in the freezer for up to 3 months. When you're ready to enjoy, just pull out a cup and let it thaw for 10 to 15 minutes at room temperature. It’s a quick and easy way to have a delicious treat on hand!
Serving Suggestions and Variations
While these classic Homemade Reese's Cups are a treat on their own, you can elevate your presentation by serving them on a decorative plate or in a cupcake box for gifting. You could also drizzle some melted chocolate on top or sprinkle sea salt for a gourmet touch. Alternatively, try pairing them with fresh fruit, such as sliced apples or strawberries, to balance the richness with some brightness.
For a fun twist, consider mixing in crushed pretzels for added crunch or using flavored peanut butter like honey-roasted or chocolate peanut butter for different flavor profiles. Even adding a layer of crushed nuts or toffee bits inside the cups can give an exciting texture variation. These ideas allow you to customize the recipe based on preferences or seasonal inspirations!
Questions About Recipes
→ Can I use different nut butters?
Absolutely! Almond or cashew butter can be great alternatives to peanut butter.
→ How long do they last?
These cups can last up to two weeks if stored in an airtight container.
→ Can I make them vegan?
Yes! Use dairy-free chocolate and natural nut butter to keep them vegan.
→ What kind of chocolate is best?
Using high-quality chocolate will give the best flavor. Dark chocolate can also enhance the richness.
Homemade Reese’s Cups Classic
Created by: Ella Townsend
Recipe Type: Desserts Made Easy
Skill Level: Beginner
Final Quantity: 12 cups
What You'll Need
For the Chocolate Coating:
- 1 cup of chocolate chips (milk or dark)
- 1 tablespoon of coconut oil
For the Peanut Butter Filling:
- 1/2 cup of creamy peanut butter
- 1/4 cup of powdered sugar
- 1/2 teaspoon of vanilla extract
How-To Steps
In a microwave-safe bowl, combine the chocolate chips and coconut oil. Heat in 30-second intervals, stirring between each until the mixture is smooth and fully melted.
Line a muffin tray with paper liners or use silicone molds. Once the chocolate is melted, spoon a tablespoon into each mold, spreading it to cover the base evenly.
In a separate bowl, mix the peanut butter, powdered sugar, and vanilla extract until smooth and creamy.
Once the chocolate base is set, add a generous spoonful of the peanut butter mixture on top of the chocolate in each mold.
Pour additional melted chocolate over the peanut butter filling to cover it completely. Tap the tray gently on the counter to remove air bubbles.
Place the tray in the refrigerator for about 15-20 minutes or until the chocolate has hardened. Once set, enjoy your delicious homemade treats!
Extra Tips
- For an extra twist, consider adding a sprinkle of sea salt on top of the chocolate before chilling for a sweet-salty flavor explosion.
Nutritional Breakdown (Per Serving)
- Calories: 380 kcal
- Total Fat: 26g
- Saturated Fat: 15g
- Cholesterol: 195mg
- Sodium: 85mg
- Total Carbohydrates: 32g
- Dietary Fiber: 3g
- Sugars: 24g
- Protein: 6g