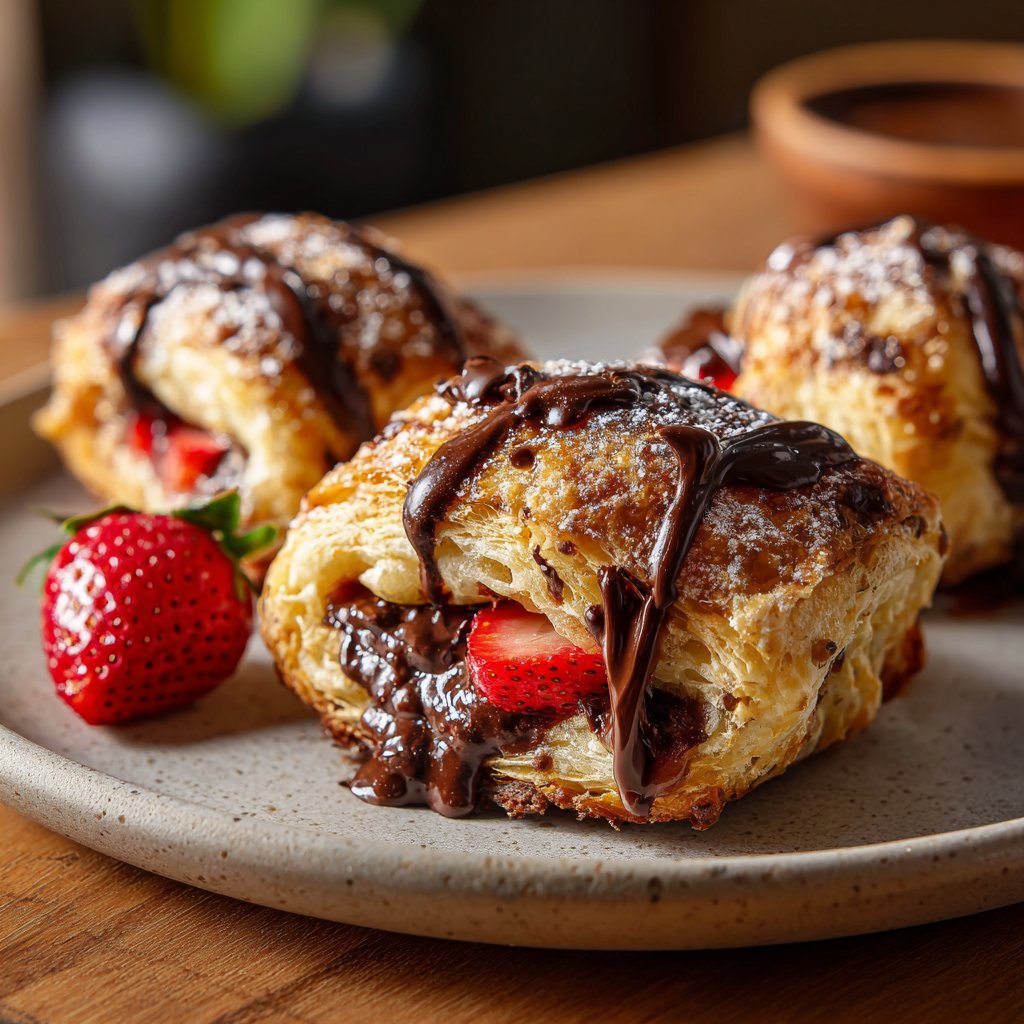
Valentines Snacks Mini Puff Pastries
Highlighted under: Desserts Made Easy
I love treating my loved ones to something special on Valentine’s Day, and these mini puff pastries never fail to impress. With their flaky layers and delightful fillings, they bring a touch of elegance to any gathering. I enjoy personalizing them with different flavors, making each bite a surprise. Whether it’s sweet or savory, these adorable pastries come together quickly and are perfect for sharing. They’re not just tasty—they're an experience that says you care, all wrapped up in a beautiful golden crust.
When I first made these mini puff pastries, I was amazed at how easily they came together. I decided to experiment with different fillings, from sweet chocolate to savory cheese and spinach. The results were always a hit! I learned that using high-quality puff pastry is key to achieving that perfect flaky texture. It rises beautifully in the oven and creates the kind of golden-brown shell that really elevates any filling.
Another tip I discovered is to brush the pastries with an egg wash before baking. This not only gives them a stunning shine but also helps achieve that wonderfully crispy crust. With these delicious little bites, I’ve created many cherished moments with family and friends—perfect for Valentine’s Day celebrations!

Why You'll Love These Mini Puff Pastries
- Flaky, buttery layers that melt in your mouth
- Customizable fillings to suit any taste preference
- Perfect for sharing at parties or romantic dinners
Understanding Puff Pastry
Puff pastry is a magical ingredient that creates light, flaky layers through a process called lamination. The key is using cold butter and rolling it out multiple times to create those beautiful air pockets. This technique gives the pastries their signature puff while baking. When handled properly, you'll achieve a golden-brown crust with a satisfying crunch that contrasts with the tender filling inside. Make sure your butter is sufficiently chilled during preparation to ensure optimal layering by preventing it from melting into the dough.
Another tip when working with puff pastry is to keep everything cold. The dough should remain chilled as you roll and cut it, which helps it achieve maximum lift in the oven. If it becomes too warm, you may end up with dense pastries. I recommend placing the rolled-out pastry in the refrigerator for about 10-15 minutes before you cut and fill it. This little trick can make a significant difference in texture!
Filling Variations and Substitutions
The beauty of these mini puff pastries lies in their versatility. While chocolate-strawberry and spinach-ricotta are delightful options, you can explore countless other fillings. Consider using almond paste combined with fresh cherries for a sweet treat or a mixture of goat cheese and sun-dried tomatoes for a savory twist. The balance of flavors is essential; try combining creamy elements with something fresh or tangy to keep every bite engaging.
If you want to cater to dietary restrictions, there are several easy substitutions. For a gluten-free option, look for gluten-free puff pastry alternatives available in stores. Dairy-free fillings can be achieved using substitutes like almond cream or nutritional yeast mixed with sautéed mushrooms for a savory option. Ensuring everyone can enjoy these pastries will make your dessert table more inclusive.
Ingredients
For the Puff Pastry
- 1 package of puff pastry (thawed)
- 1 egg (beaten, for egg wash)
For Sweet Filling
- 1/2 cup chocolate chips
- 1/4 cup fresh strawberries (sliced)
For Savory Filling
- 1/2 cup ricotta cheese
- 1/4 cup fresh spinach (chopped)
- 1/4 cup grated parmesan cheese
Feel free to mix and match fillings according to your preference!
Instructions
Prepare the Puff Pastry
Preheat your oven to 400°F (200°C) and line a baking sheet with parchment paper. Roll out the thawed puff pastry on a floured surface until it is about 1/8 inch thick. Cut out small squares (approximately 3x3 inches) with a pizza cutter.
Add the Filling
Place a small spoonful of sweet or savory filling in the center of each pastry square. Be cautious not to overfill. Fold the corners of the pastry over the filling to form a triangle or rectangle and press the edges to seal tightly.
Brush with Egg Wash and Bake
Brush the top of each pastry with beaten egg for a golden crust. Arrange them on the prepared baking sheet and bake in the preheated oven for about 15 minutes or until they are puffed and golden brown.
Serve
Remove from the oven and let cool slightly before serving. Enjoy warm!
These pastries can be served warm or at room temperature.
Pro Tips
- Experiment with different fillings like meats, fruits, or spices to create your perfect bite! Remember to preheat your oven for the best result.
Make-Ahead and Storage
These mini puff pastries can be prepared ahead of time, making them perfect for busy occasions. You can prepare the fillings and assemble the pastries a few hours in advance. Just keep them covered in the refrigerator to ensure they stay fresh. Alternatively, you can freeze the assembled pastries before baking. Simply place them on a baking sheet to freeze individually and transfer them to a freezer-safe bag once solid.
To bake frozen pastries, there's no need to thaw them; just add an extra 5-10 minutes of baking time. They will puff up beautifully and taste as fresh as if they’d just been made. I love the convenience of having a batch ready for unexpected guests or a last-minute gathering!
Serving Suggestions
When serving these mini puff pastries, presentation matters. Arrange them on a decorative platter and consider garnishing with fresh herbs or a light dusting of powdered sugar for sweet options. For a more interactive experience at a gathering, pair the savory pastries with a selection of dips like marinara or pesto. This way, your guests can mix and match flavors for a fun twist.
These pastries are equally delightful served warm straight from the oven or at room temperature. If you're planning a romantic dinner, consider pairing them with a glass of sparkling wine to elevate the experience. Their elegance is sure to impress, and the variety will encourage guests to try multiple flavors.
Questions About Recipes
→ Can I freeze the puff pastries?
Yes, you can freeze the unbaked pastries. Just assemble them, place them on a baking sheet, freeze until firm, then transfer to a freezer bag. Bake from frozen, adding a few extra minutes to the cooking time.
→ How do I store leftovers?
Store any leftover pastries in an airtight container in the refrigerator for up to 3 days. Reheat in the oven for best results.
→ Can I use homemade puff pastry?
Absolutely! Homemade puff pastry can add a delicious touch to your mini pastries, although store-bought is a convenient option.
→ What can I serve with these pastries?
These pastries pair well with dipping sauces like chocolate sauce for sweet fillings or marinara sauce for savory options.
Valentines Snacks Mini Puff Pastries
Created by: Ella Townsend
Recipe Type: Desserts Made Easy
Skill Level: Beginner
Final Quantity: 24 pastries
What You'll Need
For the Puff Pastry
- 1 package of puff pastry (thawed)
- 1 egg (beaten, for egg wash)
For Sweet Filling
- 1/2 cup chocolate chips
- 1/4 cup fresh strawberries (sliced)
For Savory Filling
- 1/2 cup ricotta cheese
- 1/4 cup fresh spinach (chopped)
- 1/4 cup grated parmesan cheese
How-To Steps
Preheat your oven to 400°F (200°C) and line a baking sheet with parchment paper. Roll out the thawed puff pastry on a floured surface until it is about 1/8 inch thick. Cut out small squares (approximately 3x3 inches) with a pizza cutter.
Place a small spoonful of sweet or savory filling in the center of each pastry square. Be cautious not to overfill. Fold the corners of the pastry over the filling to form a triangle or rectangle and press the edges to seal tightly.
Brush the top of each pastry with beaten egg for a golden crust. Arrange them on the prepared baking sheet and bake in the preheated oven for about 15 minutes or until they are puffed and golden brown.
Remove from the oven and let cool slightly before serving. Enjoy warm!
Extra Tips
- Experiment with different fillings like meats, fruits, or spices to create your perfect bite! Remember to preheat your oven for the best result.
Nutritional Breakdown (Per Serving)
- Calories: 200 kcal
- Total Fat: 14g
- Saturated Fat: 7g
- Cholesterol: 90mg
- Sodium: 220mg
- Total Carbohydrates: 18g
- Dietary Fiber: 1g
- Sugars: 2g
- Protein: 3g